Boring outfit? Not for much longer! Read on to learn how to change the color of a shirt in Adobe Photoshop. We’ve all been there: You’ve worn the same shirt in too many Instagram photos. Your whole friend group is wearing clashing colors. You simply don’t like the outfit you picked out. No matter what the reason is, there are instances that require changing the color of your shirt in Photoshop. If you’ve clicked on this tutorial hoping to amend a fashion faux-pas or merely have some fun with editing, you’ve found the right place. Editing images in this way isn’t always easy, but the process itself is simple and only requires three steps. Note: For this tutorial, we won’t be using the “color replacement” tool—which is commonly believed as the tool best designed for a shirt color swap like this. Although the color replacement tool works in certain cases, the methods below work in more applications and generally produce better results.
- Open the image in photoshop and duplicate the layer. It’s best practice to always keep a copy of your original photo somewhere in the Photoshop document, in case you need to redo any steps later. In this tutorial, though, it’s also essential for keeping the non-edited parts of the photo intact.
- Create a mask of the clothing item you would like to change.
There are probably hundreds of ways to cut out a piece of an image in Photoshop—you can see a full guide to making cutouts here. If you have your own preferred method, feel free to deviate from the following instructions and skip to step 3.
Standard method: If you want to walk through the process, start by using the polygonal lasso tool to draw a rough shape around the clothing item you would like to edit. Then, click the mask icon
 in the layers panel. If you click the eyeball beside your background layer, you might notice that the only thing you can see now is the shirt! If so, you have successfully created a mask. Anything you draw on this mask (shown in the layers panel as a black and white square to the right of the layer) in black will disappear and anything you draw in white will be visible. To edit the mask more closely, go in with a small brush of medium softness and draw black on the parts you don’t want until the only thing you can see in Photoshop is the soon-to-be-recolored shirt.
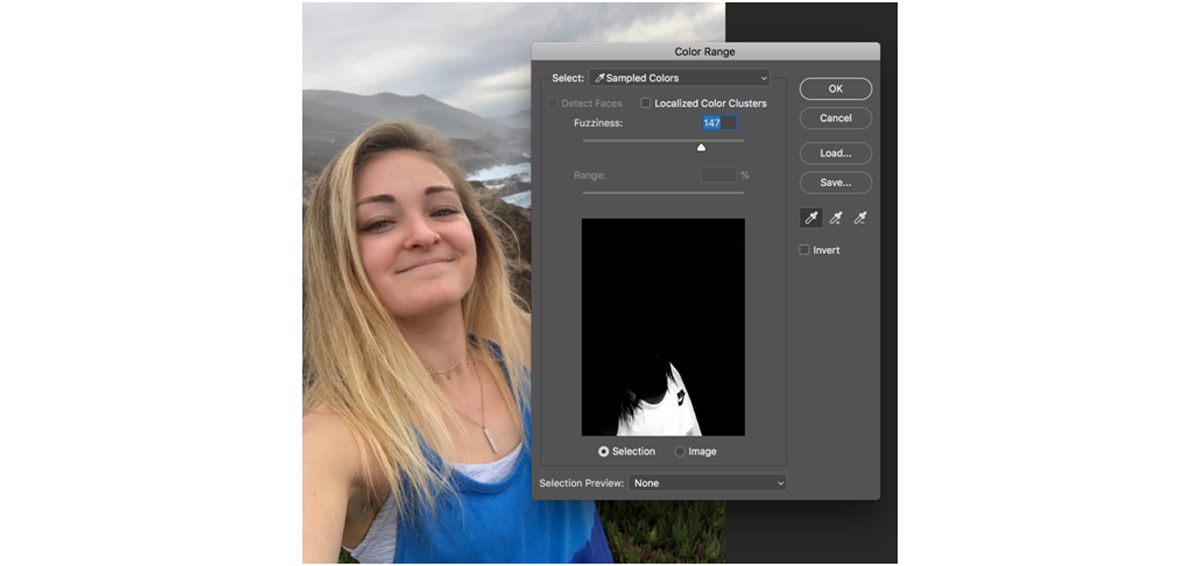 The color range selector is helpful when you’re working with a color that isn’t found anywhere else in the photo.
Alternative method (for unique colors): If your shirt is a vibrant color that isn’t found anywhere else in the image, like this tank top, you might enjoy using the color range selector instead. Go to Select > Color Range and use the eyedropper tool to select the shirt color. Then, use the slider to intensify or soften the specificity of the color range selector until only your shirt is visible, as shown below. Then, just click the mask icon and prepare for step three. - Open the Hue/Saturation window and click “colorize.” Then, adjust the settings as necessary.
Once your mask is prepared, click on the image of that layer. Open the Hue/Saturation window under Image > Adjustments. In here, click the “colorize” button on the bottom of the pop-up and drag the hue, saturation, and lightness sliders until you find your desired color. (If you want to make a shirt brighter or darker instead of changing the color, you don’t have to click “colorize.” You can just manipulate the lightness in this window instead.)
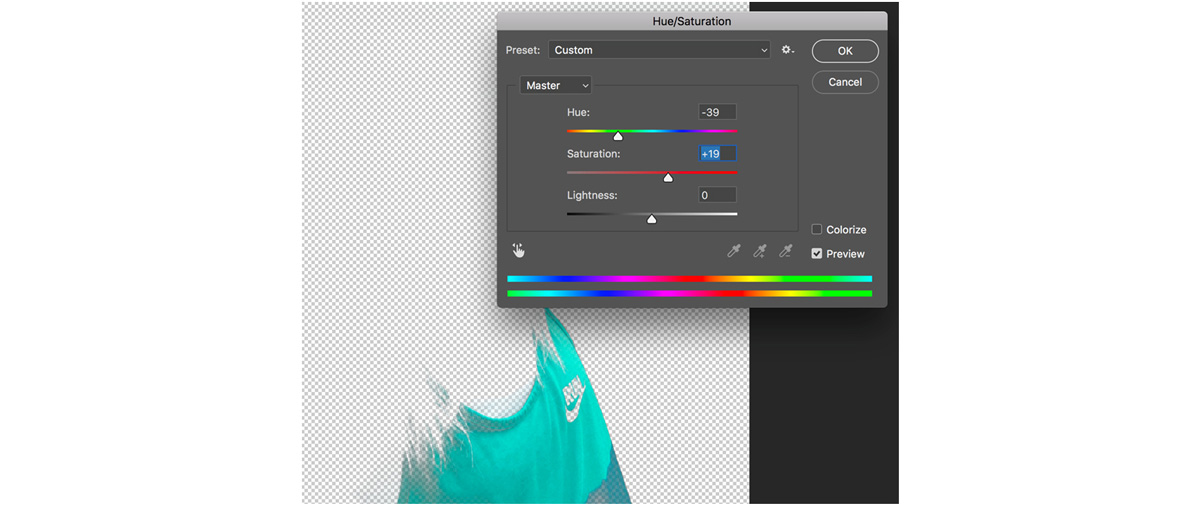 Since I wanted to make the blue tank top more vivid and bright, I decided not to use the “colorize” tool and instead just amped up the saturation and shifted the blue hue to something more teal.
 - Turn the background back on and view your finished image.
With your shirt edited, you can preview your completed image. Since this process only requires one extra layer, you can duplicate the edited shirt layer to create a few different colors of the shirt, just to give yourself options.
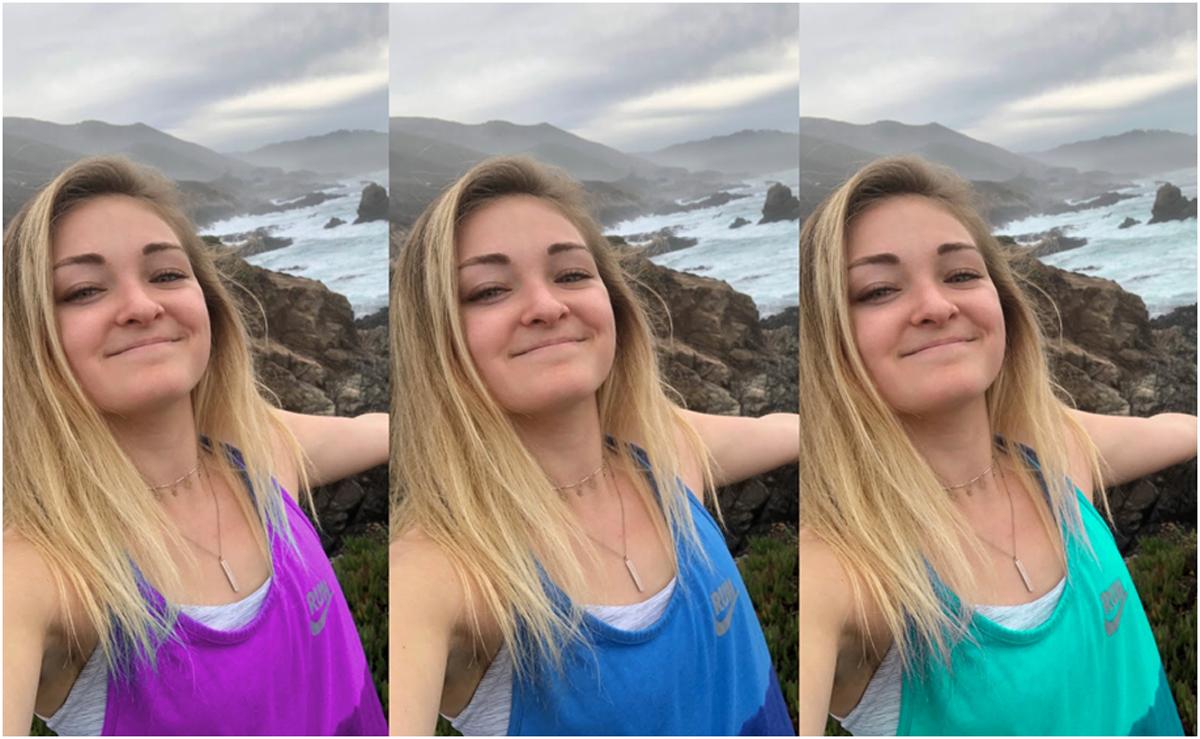 It’s fun to create multiple versions of your image to compare different shirt colors!
Of course, if you decide that after all of this, the shirt is still too ugly…well, there’s always the option of drawing a new one on in Adobe Illustrator. Are you a current student? See how you can save over 60%.

